We all wish that we could have the perfect skin or perfect hair or perfect whatever it is. Looking in magazines, we see a lot of "perfect" girls/boys. BUT perfection does not exist. Those "perfect" pictures are taken after hours of professional hair and makeup.
Rather than try to be perfect, let's be the BEST version of ourselves! Let's stop comparing ourselves to other people and start being ourself. THE most important thing I ever learned about makeup is that makeup does not conceal or hide, makeup enhances. Let's show off our best features with this easy makeup tutorial on how to achieve that No-Makeup look.
Let's start with the basics.
A clean and moisturized face is an essential for ANY makeup look.
Before applying foundation, ALWAYS apply primer.
Primer creates a smooth base for the foundation.
Plus, it keeps the foundation from moving throughout the day.
Now, it's time to even out that skin tone!
For a more natural look, apply dots vertically down the center of your face.
Then, blend it all out with a Beautyblender or brush.
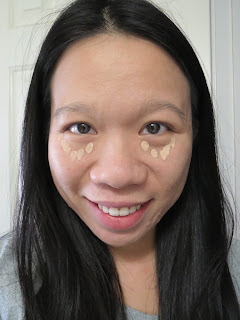
To brighten up your face, apply concealer under your eyes.
This triangular shape will brighten and lift that whole eye area.
For those stubborn zits, apply a creamy (moisturizing) concealer.
A concealer that is drying or shimmery will only make the zit look worse.
Your face is not complete without some great brows!
Eyebrows frame your face.
Following the line of your natural brow, start to fill them in.
I like to draw two lines, one above and one below to mark out the shape.
Then, I fill in the center with the excess product.
Spread out the product with a brush for a soft, natural brow look.
Now, lock all your hard work in place with some clear brow gel!
When you highlight your brow bone, you brighten your face and enhance those face framing brows.
I like to take that same highlighter to line the bottom and inner corner of my eyes.
This technique really brightens up the face, making you look awake and ready to take on the day!
Time to CONTOUR!
Slim down your nose by contouring both sides...
Now, contour the hollows of your cheeks...
When I contour I like to write the number "3"
I draw my brush down from the side of my temple, curve in to the hollow of my cheeks, and draw it back from the hollow of my cheeks to the jawline.
Finish off the look with a nude lip gloss.
Viola! You're done.
This look is perfect for work, class, or even a casual date!
Where would YOU rock this look?


No comments:
Post a Comment